So, you track interactions with some element and you calculate the engagement with that element based on interactions/pageviews? If the element you track is below the fold you are doing it wrong! The right way to do it is tracking the engagement based on real impressions (the times the element was actually visible).
It sounds scary and complicated to setup this, but in reality all you need is Google Tag Manager, one simple HTML tag and one Custom Event trigger (of course some basic JS knowledge is require to adjust the code for your situation).
The usage of this trigger is unlimited – from tracking how many of your visitors really saw that you have video down the page to tracking banners and promotions views. Virtually every HTML element of your page that you want to track correctly and is below the fold.
So let’s start creating this beautiful trigger!
The Custom HTML Tag
Let’s start with the code itself, and I will break it down step by step:
The script is based on 5 main sections, and you need to edit just the first 2, based on your specific scenario.
- Define footprint for the page type containing your element:
var hasDeals = /products/.test(location.href);
Here you should declare the footprint that defines all the pages containing your element (in this example – all banners are in the product page, so we search for the footprint in the URL).
You can use any footprint (for example – similar class, id, or even some attribute that you know it’s on all pages with your element but not in the rest of your website. You can use
querySelectorAllfor this).It’s important to define this variable as boolean, so if you are using CSS Selector make sure you use
document.querySelectorAll('{{CSS selector}}').length, as it will returns directly 0 (false) when your element is not existing and you can use!hasDealto turn it totrue. - Define the element you want to track:
var element = document.querySelector('.deal-offer');This part is pretty straightforward – you just need to declare the element you want to track. At this example I am using
querySelectorfor element with class ‘deal-offer’, but you could usegetElementsByClassName('deal-offer')[0]as well.In any case – you just need to edit this line according your needs.
- Initialize basic variables:
var elVisible = false;
var eventPushed = false;
var scrolls = 0;
Here you just declare some variables for the script to work. The
elVisibleis the trigger when the element is visible, theeventPushedis to assure once the element was visible and the push to Google Tag Manager was done – the script stops. Thescrollsis the most interesting and completely optional part of the script. Check below to see what it does - Add the Scroll Listener:
if(hasDeals>0) {
	document.addEventListener("scroll", function() {scrolls+=1; if(scrolls%7 === 0) {isScrolledIntoView(element);}} );
}
This part of the script attach Scroll Listener, so the script checks on every scroll if the element becomes visible. The unique part of the script is the
ifdeclaration. It’s completely optional, and honestly I tried it for the first time as a way to improve the performance of the script as much as I can.The idea – instead of firing the function for checking the element on every detected scroll event it fires it on every 7th scroll. I have no information if this really improves the performance, but it looked neat, so I just left it there. 7 is the best number I tried that works well even on the fastest scrolling.
You can adjust the number or remove that part altogether.
- Checking if the element is visible and sending push when it does:
function isScrolledIntoView(el) {
...
      dataLayer.push({'event': 'dealVisible'});
      eventPushed = true;
    }
}
This is the main function that makes the script works. It checks if the element is completely visible. When it is – it fires a
dataLayer.pushwith event (the actuall GTM trigger) and also sets theeventPushed = true;, so the script stops listening.
The Trigger
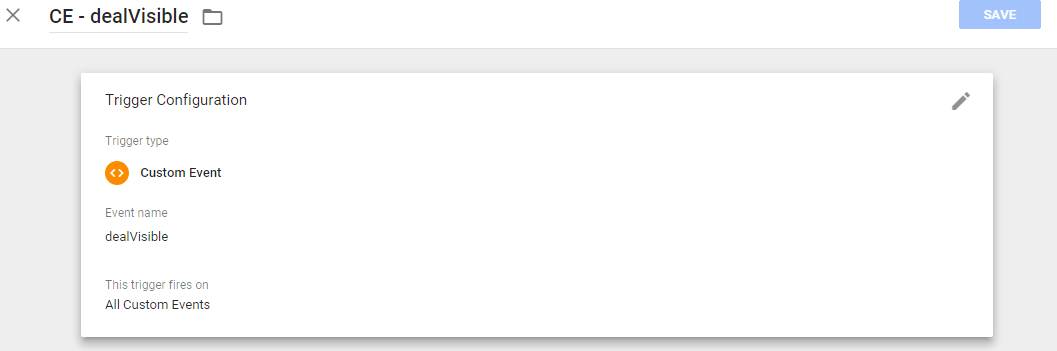
Now you are ready to use this trigger in any way you need – sending simple impression events for various elements or sending E-commerce Impressions data for internal promotions. If you have any problems or questions about this trigger – just drop a comment below!
3 Comments
Если вы ищете надежного помощника в походах и домашних делах, обратите внимание на многофункциональный нож купить в москве складной, который сочетает в себе качество, удобство и долговечность.
Одним из главных плюсов такого ножа является лёгкость его ношения благодаря компактному размеру.
Если вы ищете качественный и надёжный звук, обратите внимание на микрофон c1 у behringer, который идеально подойдёт для студийной записи.
Также микрофон имеет кардиоидную диаграмму направленности, позволяющую снизить фоновые шумы.
Hi there, thanks for publishing this, really straightforward and simple
I tweaked your code a little to track all impressions of similar tags on a page, thought this might be helpful for future readers
window.addEventListener(‘load’, function () {
var links = document.querySelectorAll(“a[href*=”], a[href*=’/’]”);//define what to track impressions for here
var visible_elements = [];
var pushed_elements = [];
var scrolls = 0;
if(links.length >0) {
document.addEventListener(“scroll”, function() {scrolls+=1; if(scrolls%7 === 0) {isScrolledIntoView(links);}} );
}
function isScrolledIntoView(links) {
links.forEach(function(link){
if (visible_elements.indexOf(link) == -1){
var elemTop = link.getBoundingClientRect().top;
var elemBottom = link.getBoundingClientRect().bottom;
var isVisible = (elemTop >= 0) && (elemBottom <= window.innerHeight);
if (isVisible == true) {
visible_elements.push(link);
console.log(`${link} became visible`); // Comment out for production
}
}
else if (pushed_elements.indexOf(link) == -1){
dataLayer.push({
'event': '', // event name
'eventCategory': '', // category
'eventAction': '', //action
'eventLabel': link.getAttribute("href"), //label
});
pushed_elements.push(link);
}
});
}
});